Using a Nail Kit: Essential Tips for Perfect Home Manicures
Maintaining well-groomed nails is not only a cornerstone of a polished appearance but also a delightful self-care practice that promotes relaxation and satisfaction. With the proper tools and techniques, you can achieve salon-quality results in the comfort of your own home. A comprehensive nail kit is essential for this personal grooming ritual, providing you with the necessities to shape, buff, and care for your nails effectively.
Preparation lays the groundwork for any successful manicure. Understanding the basic techniques of nail care is paramount for preventing damage to your nails and ensuring a clean canvas for polish application. This involves cleaning and trimming your nails, as well as taking care of your cuticles—steps that are foundational to nail health and aesthetics. Mastering these basics will enhance the durability of your nail polish and improve the overall look of your manicure.
As you become more adept with your nail kit, you might want to explore more advanced nail art techniques, adding a personal touch to your manicure. This creative aspect can be as simple or as intricate as your skills allow. Routine maintenance and aftercare will extend the life of your manicure and keep yyour beautiful nails strong and healthy. When questions arise, remember that the nail care journey is common, and the answers to frequently asked questions can easily be found to ensure you are informed and capable of handling any nail-related challenge.
Key Takeaways
● A well-stocked nail kit is vital for home manicures and routine nail care.
● Knowing basic nail care techniques is essential for nail health and the longevity of your manicure.
● Regular maintenance and aftercare keep your nails healthy and extend the lifespan of your manicure.
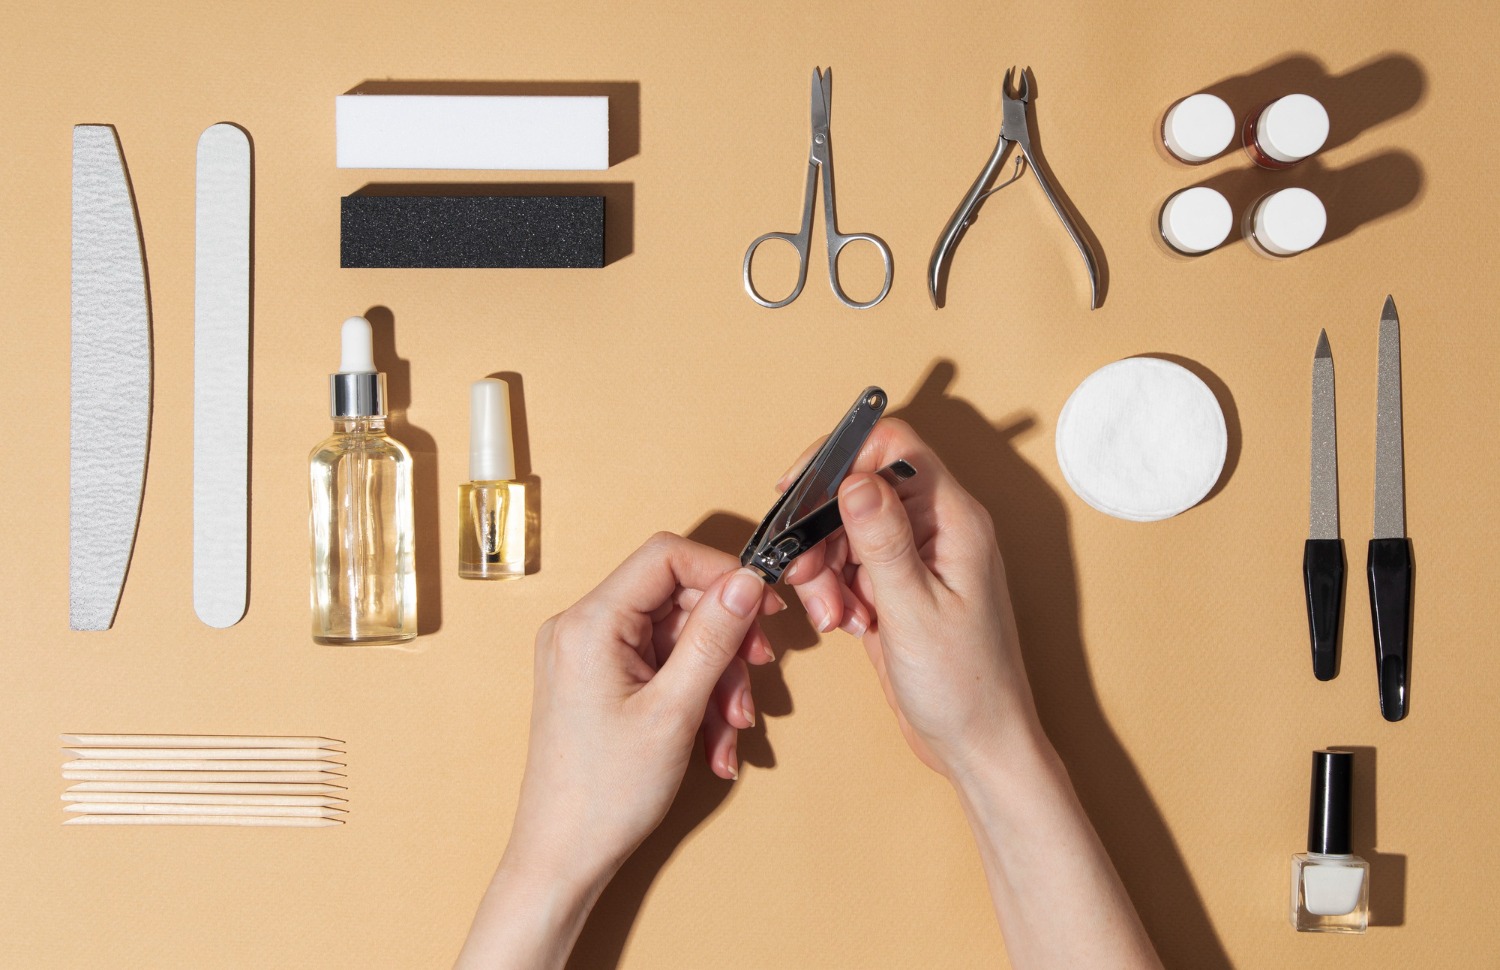
Essential Nail Kit Tools
Equipping yourself with the right tools is crucial for maintaining the health and appearance of your nails. Each tool serves a specific function to ensure that your nail care regime is comprehensive and efficient.
Nail Clippers and Nippers
Your nail kit should include a sturdy pair of nail clippers made of metal, allowing for precise cutting of the nails on your hands and feet. Commonly, two types are found in kits: the standard clipper for fingernails and the larger toenail clipper, designed for the tougher nails of the feet. Quality clippers provide a clean cut without tearing or splitting the nail.
For more detailed work, especially for removing hangnails or cutting tough cuticles, cuticle nippers play a vital role. These small, plier-like tools come with a spring-action handle and are available in different jaw sizes, typically ranging from a quarter jaw (small) to a full jaw (large).
Files and Buffers
Proper shaping and smoothing require the right kind of nail files and buffers. Nail files come in various materials such as metal, glass, and emery. They also differ in grit sizes – a higher grit number indicates a finer file which is better for smooth finishing touches.
● Metal Files: Durable but may be harsh on natural nails.
● Glass Files: Gentle on nails and provide a smooth edge.
● Emery Boards: Less durable but good for quick fixes.
Buffers work to smooth the surface of the nails, often in preparation for painting. A good buffer might have different surfaces with varying grit to shape the nail edge and create a polished look.
Cuticle Care Tools
Cuticle care is essential for the health and growth of your nails. In your kit, include a cuticle pusher and a cuticle nipper. Cuticle pushers are available in metal or softer materials like wood. Metal pushers often provide better precision, but wooden cuticle pushers can be gentler on the delicate skin.
The cuticle nipper is used to carefully trim away any dead skin and hangnails without damaging the live tissue. It’s important to use a sharp, well-maintained nipper to avoid pulling or tearing, which can lead to discomfort or infection.
Preparation and Basic Techniques
Preparing your nails properly is the foundation of a good manicure. Attention to detail during preparation will ensure a clean, polished look for your natural nails.
Initial Nail Prep
To start, you’ll want to focus on personal hygiene. Wash your hands thoroughly with soap to remove any oils or dirt. Then, apply a nail dehydrator to remove moisture and further enhance the adhesion of your nail products. Next, gently push back your cuticles and remove any dead
skin around the nail bed. It’s important to keep these areas clean to prevent any infections and promote healthy nail growth.
Shaping and Clean-Up
When shaping your nails, select a shape that complements your hands and lifestyle, such as round, square, or coffin shapes. Use a fine-grit file to shape the free edge of your nail, working in one direction to avoid splitting. Always smooth out ridges and buff away rough edges to create a clean canvas for product application.
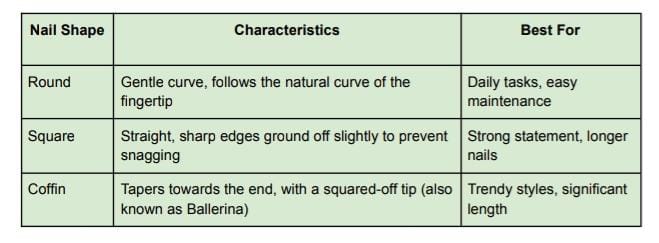
Nail Shape Characteristics Best For
Round Gentle curve, follows the natural curve of the Daily tasks, easy
fingertip maintenance
Square Straight, sharp edges ground off slightly to prevent Strong statement, longer
snagging nails
Coffin Tapers towards the end, with a squared-off tip (also Trendy styles, significant
known as Ballerina) length
Base Coat Application
Finally, apply a base coat to protect your natural nails and improve the longevity of your manicure. A clear base coat not only prevents staining from colored polishes but also helps to fill in any remaining ridges, offering a smooth surface for your color application. If using, a nail primer can be used prior to the base coat to further improve the polish’s adherence. Make sure the base coat is applied evenly and allowed to dry completely before proceeding to polish application.
Nail Polish and Art Techniques
Mastering the application of nail polish and creating stunning nail art enhances the beauty and longevity of your manicure. Using the right techniques ensures a salon-quality finish with a shine that lasts.
Applying Color
● Step 1: Start with a clean base.
○ Ensure nails are clean, filed, and free from oils.
● Step 2: Apply a base coat.
○ Use a thin, even layer to protect your natural nails and promote polish adhesion.
● Step 3: Choose your colored nail polish.
○ Apply thin layers of your chosen color, allowing each layer to dry before applying the next.
Creative Nail Art
● Tools You’ll Need:
○ Fine brushes, dotting tools, or at-home gel nail kit.
● Techniques:
○ Striping: Create straight lines with nail tape or freehand with a brush.
○ Stenciling: Apply stencils or decals for intricate patterns.
○ Gel Polish: Utilize gel nail polishes for a vibrant, long-lasting look.
Sealing with Topcoat
● Gel Topcoat:
○ For gel polish, cure the gel topcoat under a UV or LED lamp.
● Regular Topcoat:
○ Use a regular top coat for colored nail polish, ensuring a sealing layer that adds shine.
● Maintenance:
○ Keep the topcoat intact by avoiding harsh chemicals and prolonged water exposure.
Maintenance and Aftercare
Proper maintenance of your nail kit is crucial to extend its longevity and ensure the health of your nails. Adherence to regular upkeep routines and correct removal practices will save you money and protect against germs that can cause infections.
Regular Upkeep
Cleaning Tools: After each use, it’s essential to clean your nail tools to prevent the buildup of bacteria and dirt that can transfer to your nail beds. Use hot, soapy water or an alcohol-based disinfectant to thoroughly clean each item.
● Files and Buffers: Replace files and buffers regularly as they cannot be sanitized and can harbor germs.
● Clippers and Pushers: Sanitize metal tools with alcohol or a disinfectant soak after each use.
Storage: Store your nail kit in a cool, dry place to avoid moisture, which can promote the growth of bacteria. Sealable containers or bags can provide protection against dirt and dust.
Removal and Nail Health
Nail Polish Remover: Opt for acetone-free nail polish remover when possible, as acetone can dry out your nail beds and cuticles. Use it sparingly and follow up with a moisturizer to maintain nail hydration.
● Avoid Overuse: Frequent use of nail polish remover can weaken your nails over time, so limit removal to when it’s necessary.
● Gentle Technique: Apply remover with a soft cotton pad, and gently press and wipe rather than rubbing vigorously.
Aftercare: Post-polish removal, apply a quality cuticle oil and hand cream to restore moisture and keep your nails and surrounding skin in optimal health. Regular moisturizing can also prevent chipping and splitting of the nails, thereby maintaining the appearance of your manicure for longer periods.
Frequently Asked Questions
Getting the right tools and knowledge is crucial for a great at-home manicure. These FAQs will guide you through the essentials of using a beginner’s nail kit effectively, ensuring your nails look their best.
What essential tools should be included in a beginner’s nail kit?
Your beginner’s nail kit should include nail clippers, a nail file, cuticle pusher, nail scissors, and a buffer. These basic tools are necessary for shaping and grooming your nails before applying any polish or treatments.
How do you properly use a manicure set for at-home nail care?
Start by cleaning your nails with soap and water. Clip nails to your desired length, file them into shape, and gently push back cuticles with the cuticle pusher. Use the scissors to trim any hangnails, and finish by buffing your nails to create a smooth surface.
What are the steps for a basic manicure using a nail kit?
First, clean your hands and nails. Trim and file your nails to the desired shape, and soak your fingertips in warm water to soften the cuticles. Push back the cuticles and trim any excess. Buff the nail surface, apply a base coat, two layers of nail polish, and a topcoat.
How do you maintain and clean your nail kit tools?
After each use, wash metal tools with soap and water and wipe them with alcohol. Store them in a dry place to prevent rust. Replace disposable items like emery boards regularly to maintain hygiene and effectiveness.
Can you give a breakdown of the uses for common nail kit tools?
Nail clippers help trim down length, while nail scissors shape the nail edges. Files smooth nail edges to prevent splitting. Cuticle pushers retract the cuticle to lengthen the nail bed, and buffers even out the nail surface. Nail brushes remove dirt and residue.
What are the differences between a manicure and a pedicure kit?
A manicure kit focuses on fingernails and usually contains smaller, more delicate tools suitable for hand nails. A pedicure kit includes tools designed for the larger toenails and often additional items like a pumice stone or foot file to address the tougher skin of the feet.
Stay in touch to get more updates & news on Discover Tribune!